10 new Primavera P6 PPM features you’ve been waiting for

The RPC P6 experts pick out what we think are the 10 best new features for working smart in the latest release of P6 Professional: Version 22.
Are you up to date with all the latest tips and tricks in Oracle Primavera P6 PPM Version 22? Wondering whether it’s worth the upgrade? We’ve been through the update so you don’t have to and we’ve pulled out ten of the best new features, including new Earned Value fields, improved sorting, filtering and reporting, time-saving shortcuts when importing data or copying templates and much more.
We think there’s lots to be excited about in this latest release. Get in touch with us to find out more or for a more detailed discussion about your requirements. You’ll find our contact details at the end of this blog. You can also watch our webinar: What’s New in P6 PPM V22 to see all these new features in action by clicking the image below.
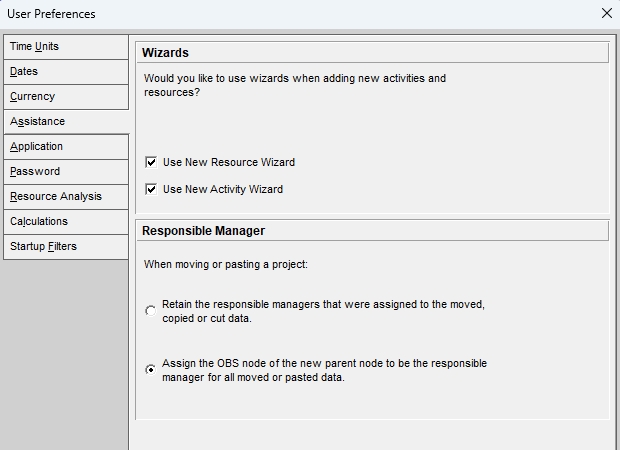
1 Automatically assign OBS options when copying a project
The User Preferences options now include a shortcut that will help to streamline some of the processes when you are copying a project. In the Assistance tab you’ll find an option to control the assignment of the OBS to a copied project. You can decide for yourself whether to retain the responsible managers that were assigned to the moved, copied, or cut data or to assign the OBS node of the new parent node to be the responsible manager for all moved or pasted data. Just click next to the option you choose.
This is a quick and easy new feature that cuts out the need to manually assign OBS nodes when you move, cut or copy data and projects.
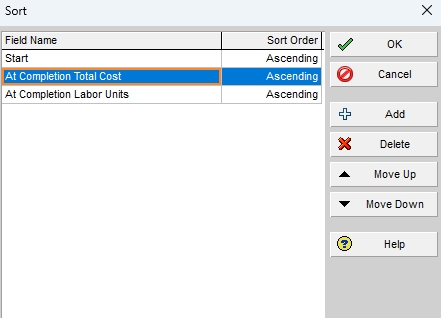
2 Customise your Sort Order
This simple product enhancement is a boon. Instead of having to add sort fields in the order you require for the operation, you can amend the order of a list of fields by highlighting the one you wish to move and using the Move Up or Move Down button, as required.
To access your Sort fields, go to View > Group and Sort > Sort, adjust the order if necessary and then click OK to perform the action. Data is sorted by the data type at the top of the list first, then by each successive data type moving down the list in order.
It’s worth noting that Sort order cannot yet be saved and will be lost when you go on to click on a column header.
3 Duplicate Import and Export Templates
This one’s a real time-saver. No more pain-staking checking or laborious line-by-line activity when you just need to create a copy of a template and make a small change. In the Import and Export template dialog boxes you’ll now find an option to Duplicate for all import and export types. You can then edit your duplicated template, rather than starting from scratch to build a whole new template.
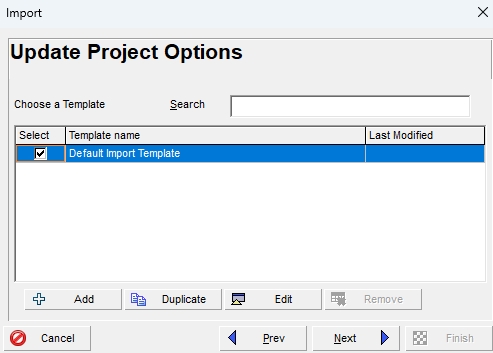
You can duplicate XER, XML, Microsoft Project XML, and Microsoft Project MPX import templates. You can also duplicate Excel XLSX, UN/CEFACT, IPMDAR (when you are connected to an EPPM database), Microsoft Project XML, and Microsoft Project MPX export templates. After duplication, you can modify your duplicated templates to suit your needs.
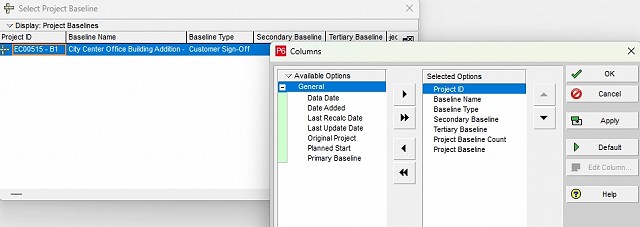
4 More Easily Identify the Correct Baseline to Assign
When assigning baselines, you can now see more information about the available baselines. Instead of selecting a baseline from a simple pull-down list, P6 Professional presents the baselines to choose from in a customisable dialog box. You can add columns to the dialog box and click a column heading to sort the list. Go to Project > Assign Baselines > Select Project Baseline to customise columns and see more information about your selected baseline. Click in the columns area to open the menu and select Columns to open a new list of options, including Primary, Secondary and Tertiary Baselines, Planned Start, Project Baseline Count and more.
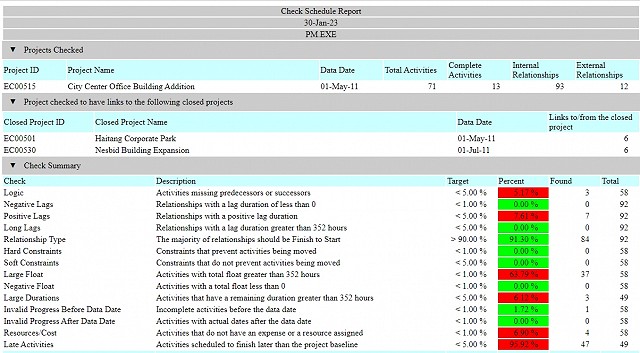
5 Quantitative Schedule Check
A new Check Schedule report option in the Tools menu answers a growing demand for a Quantitative Schedule Check to view potential issues in a schedule and support cost and schedule risk analysis on a project.
You must always run a Qualitative Check before performing this task to ensure that the full project scope and contract requirements are included, to identify inappropriate schedule options, excessive floats and unachievable task durations, and cover all other key schedule checks.
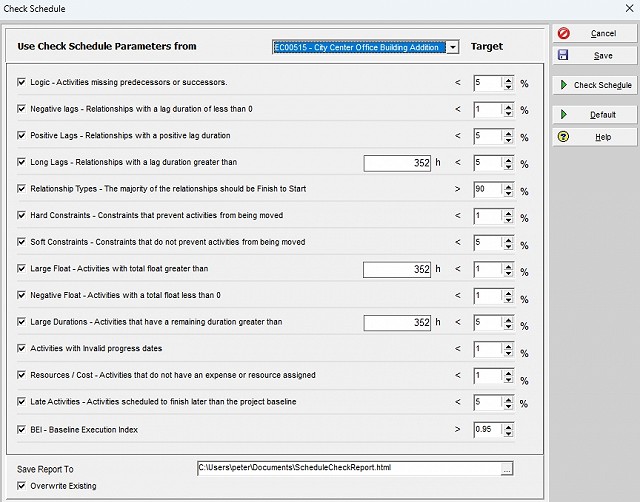
Within the Check Schedule settings dialog box, users have multiple options for customising their analysis parameters and you can save your settings for future checks, if there is one set of parameters you always use. Something for further development might be the option of creating a range of pre-set parameters, or profiles, for different reporting scenarios, but for now if you want to specify anything other than the default or your own saved default, settings need to be changed manually each time.
Once your settings are as required, click Check Schedule to run the report, which will open in your browser.
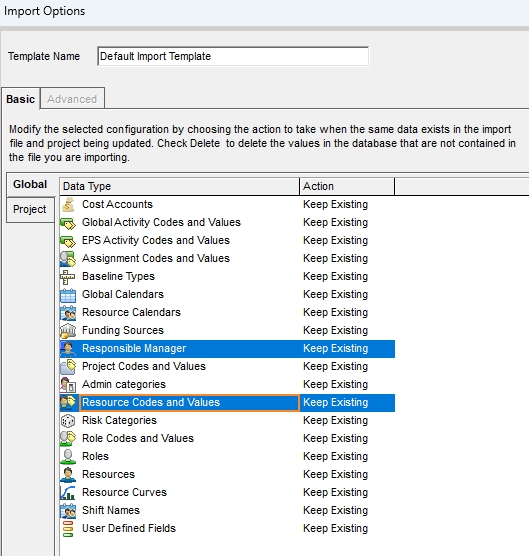
6 New options for importing XML Data
You’ll notice that the list of Import Options has grown in version 22, and when you are importing an xml file you can modify the actions for managing Resource Calendars and the Responsible Manager field.
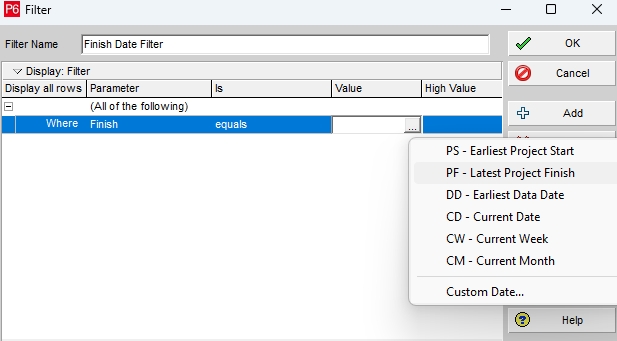
7 Finish Date Filter
Oracle has been changing their date filter operation over recent versions, but this latest one gives you the ability to take control of how your Date Filters work. In v20.4 filter operations were changed to select the end of a time period, rather than the start. With this latest release, you can choose to revert to using the start of a current date, week or month in order to align with previous versions, if you wish.
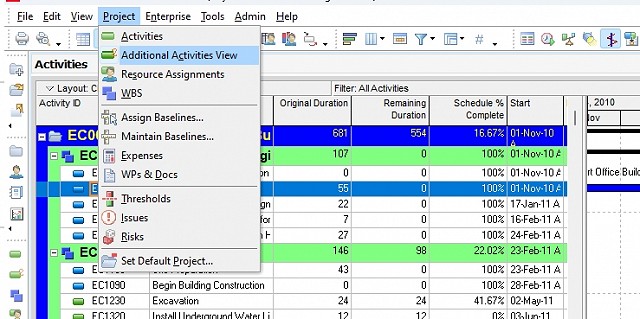
8 Additional Activities View
This clever new feature cuts out the need to toggle between screens or come in and out of different Activity views and is going to cut down on time, hassle and potential error and confusion.
Now, you can open two Activity windows side-by-side to access different types of information or compare data within different areas of a project. Go to the Project menu and you’ll find a new option: Additional Activities View. This will open a second view of the project or projects you have already open. Use the Vertical Tab Group icon in the top menu bar to open the two views side-by-side then drag the vertical dividing bar to resize them if you wish.
What’s really clever, is that you can format each window independently and print each one separately, but scheduling one view will also schedule the other and you cannot set different Schedule Options or Schedule Check Report options in the two separate views.
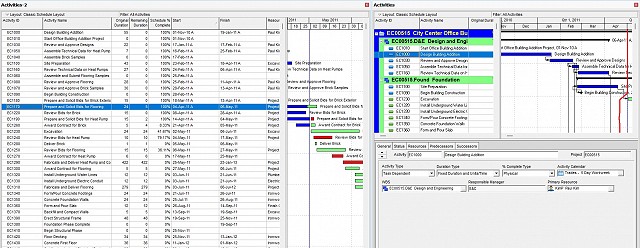
View Projects Side-by-Side
In the Projects menu, select Additional Activities View to open and compare two projects side-by-side. You can open different layouts in each view, and the layouts are saved independently. You can filter, group, and sort the views separately. Each view can be configured differently for critical path and check schedule options, and auto-reorganisation works independently in the two views. Both views can be docked and you can copy and paste or drag-and-drop activities between them. You can print either view simply by clicking on the view you want to print before clicking Print.
9 New Earned Value Fields
This latest version of P6 has a powerful new Earned Value feature built in, with setting options for Budget at Completion, Estimate to Complete, Planned Value Cost and a range of other Earned Value metrics to add depth to your reporting. You can access these via the Resource Assignments Columns window or by selecting Activity Details > Resources to open the Resources tab.
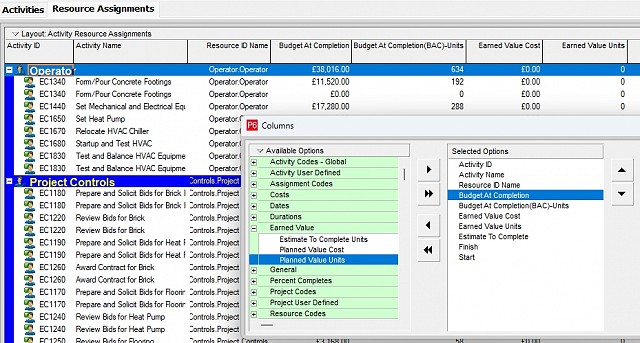
Earned value is calculated for assignments. On the Resources tab of Activity Details and the Planning tab of Resource Assignments Details you can view the following fields: Assignment % Complete, Budget at Completion Units, Budget at Completion, Estimate to Complete Units, Estimate to Complete, Earned Value Units, and Earned Value. These fields are also available as columns for Resource Assignment spread.
The calculations used for these fields take into account the Earned Value Technique in use for the WBS of the assignment's activity, whether a resource curve is applied to the assignment, the calendars assigned to the resource or activity, and the percent complete type of the activity where relevant. The data is calculated live and is not stored in the database.
10 What Else is New?
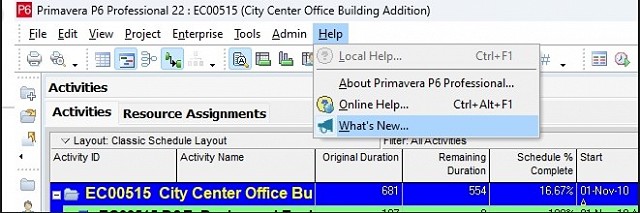
We’ve chosen our favourite new features, but this last one is really useful.
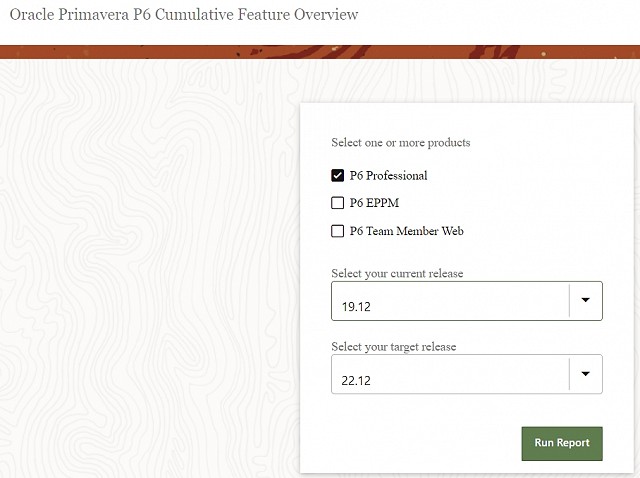
If you’re running P6 Professional 22, the Help Menu now links you straight to the Oracle website, via the What’s New option, where you can filter the Cumulative Feature Overview to see a full list of exactly what’s changed between your old and new versions of the software.

For more information on P6 Professional or P6 EPPM, contact Alex Chewins.
To watch a webinar demonstration of these new features, click here.
Back to Industry Insights